When it comes to fine-tuning the look of photos and other images more especially if you are a beginner, accessing a user-friendly editing application is one way you will be able to achieve the set results. Whether you want to perform the head swap, change the text in an image, add effects, etc, Photopea is what you need.
What is Photopea?
Photopea is a free photoshop alternative that allows you to perform photo editing and online. Unlike other similar tools which require downloading the software, installing and running it on your computer, Photopea is different. In fact, many have referred to this application when answering the question of “what is the best photo editing software”. Using the tool, you can edit text, remove background, and do much more this year.
Is Photopea free?
Yes, it is a free and open-source photo editing application available for use by anyone right from their browser. With a few non-intrusive advertisements, the development of this application continues and thus allowing anyone to fine-tune photos and images the way they want. All you need to get started is to point your browser to their website to get started. And for those who wish to use offline, you can download photopea to your phone apk, and or for PC from a site like Filehorse.
How to use Photopea PSD for Beginners?
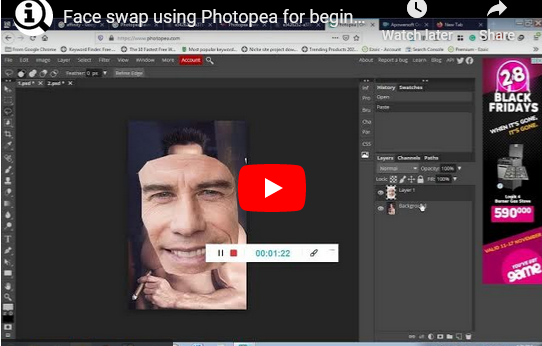
As a beginner, the kind of edits you are making in a photo determines how you are going to use the application. Taking an example of face swapping, you need to follow a set of instructions as shown in the video in order to do so.
Photopea tutorials for beginners: Video for face swap.
Face swap using Photopea video extract
- Visit “Photopea.com“
- Click “file and open”
- Select “background image and upload”
- Click the “file and open the second image”
- Click “Lasso Select tool” and select the “face from the second image
- Click edit and copy.
- Click the “first image, edit, and then paste”
- Click on the “new layer” and use the “move tool to drag pasted face”
- Tick “transform controls” and resize the copied face so it aligns with the old face
- Click on the background layer, hold the “SHIFT key” and click on the second layer of the copied face
- Click “edit, click Auto blend” to match colors of the old face, and the new face.
That is all. You will see the new face appearing on the image the way you wanted it using the above instruction and tip. You can save by File, export as, and choose your preference, for example, PNG, JPG, PDF, etc.
Note: You will need to first download and save two photos whose face you want to swap to any location on your computer before getting started.
Winding-up
Using this tool, you can change color, add and edit layers, and do much more just like that without paying a dime. Without trying it, you can’t determine the difference between Photopea vs affinity vs gimp vs photoscape, etc. The only way is to try it and check the results so you are able to determine. You can also download this application on Windows 10 and other versions like 8 and 7 if you get a working link. Otherwise, if you are looking for an alternative, this works just fine as far as this review is concerned.
Discover more from Thekonsulthub.com
Subscribe to get the latest posts sent to your email.
![[SOLVED] Screen Overlay Detected In Android Phones](https://www.thekonsulthub.com/wp-content/uploads/2017/08/image.png)